Tuesday, September 23, 2014

Cauliflower Soup With Blue Cheese Walnut Baguette

Today is the first day of autumn and the weather is getting cool. It's my favourite time of year, leggings, oversized sweaters, leg warmers, changing leaves and SOUP. First day of autumns call for a good comforting soup. So me and my mom went looking for the perfect recipe and decided on a classic cauliflower soup kicked up a notch with so
me autumn flavours.

Looking through Pinterest I've felt inspired to make a real rustic meal. From the photography to the flavours. The creamy blue cheese and roughly chopped almonds adds the perfect rustic touch to the delicate cauliflower soup. And I even think I'm starting to get a hang of the photography though I still have a ways to go (so please, I invite suggestions! :) My biggest problem as far as picture taking, is a always make food come sun down! No sunlight, unfortunately makes for poorer picture :( But I will find a way with some practice!

All in all this recipe turned out to be just what I was looking for! It was like you could taste the autumn on your tongue! Definitely going on my staple soup list for those chilly evening when you need something to warm you up!


Ingredients

For the Soup
  • 2 tbsp butter
  • 1 Vidalia onion, peeled and diced
  • 3-4 cloves garlic, crushed
  • 2 sprigs fresh thyme (If you don't have fresh time on hand you can substitute for dried but fresh ingredients are always nice for taste as well as garnish)
  • 1 large Cauliflower, broken into florets
  • 1.2 litres chicken stock (approximately 5 cups....For this step you can also use 1.2 litres water with 4 chicken bouillon cubes)
  • ½ 35% cup cream
  • ½ cup milk
  • ½ cup grated Parmesan or Romano
  • sea salt and freshly ground black pepper
  • ¼ tsp freshly ground nutmeg 
  • 2 tbsp cream extra (for garnish)
  
For Baguette
  • 1 French stick
  • soft blue cheese
  • walnuts, very roughly chopped (This can be substituted with Pecans as I did, since they were what I had around the house!)
Directions

1. Melt butter in a large saucepan (make sure it is large enough to fit all your cauliflower!) and add onion with some sea salt . Cook over a gentle heat for 10-12 minutes until the onion is soft but not coloured.

2. Add garlic and thyme and cook a couple of minutes more.

3. Add cauliflower and stock, cover and bring to a boil then reduce to a simmer and cook for 20 minutes or until the cauliflower is easily pierced with a knife. (At this step you want to make the cauliflower stalk is done tender as well because it will take longer than the rest)

4. Add cream, milk and Parmesan and cook a further 5 minutes. Remove from the heat and blend in a food processor, or with a hand blender until smooth and creamy. (A regular blender works just as well at this step but I would not recommend an electric beater with the whisk attachments, I attempted this first and the consistency did not come out smooth enough.)

5. Test for seasoning and if necessary add a little more sea salt and freshly ground black pepper . Serve hot with a swirl of extra cream and a sprinkling of nutmeg and the baguette! (At first I added the sprinkling of nutmeg for garnish but turned out to be a delicious addition that added a bit more flavour than the initial amount of it in the soup)

For The Blue Cheese Walnut Baguette

1. Slice French stick diagonally into 1 inch thick slices. (However many pieces you would like to serve...I did 8, 2 for each member of the family)  

2. Butter the bread and set oven to broil on highest rack and let the bread toast, this will only take a minute or two so watch very carefully, you would be surprised at how fast it happens!

3. Once toasted remove from oven and top with crumbled blue cheese and chopped walnuts

Monday, September 22, 2014

Almond Streusel Cherry Cheesecake Bars

So I have a family barbecue coming up and had been searching for that perfect dessert that will feed a crowd but still be beautiful and of course delicious. I considered your regular big batch desserts like brownies and cookies (of course these are still favourites of mine) but I was feeling the need to come up with something a little more summery and fresh. So it needed fruit, and it needed to be smooth and creamy...perfect solution: Fruit topped cheesecake! 

 
Cherry flavour is not at the top of my list but the fruit itself (rather than your cherry flavoured popsicles) is delicious, especially in contrast to the almond topping and amaretto cheesecake filling. Second, best part of this cake is the simplicity of the base, which is actually made from Betty Crocker Sugar Cookie Mix...along with a few other ingredients including cream cheese! Yes, there's actually cream cheese in the crust itself which gives it an amazing buttery texture.

 
This cake was a crowd pleaser! From my little cousin to my grandparents, everyone enjoyed this cake thoroughly. It was aesthetically pleasing and also had amazing summer flavours just perfect for a backyard barbecue! 


Ingredients
 
You will need a total of 3 (8oz) packages of cream cheese for this recipe
 
For the Cookie Base and Topping
  • 1 Pouch Betty Crocker sugar cookie mix (Having never used this before, looking for it at the store I was looking for a box, like a cake mix, though it actually turned out to be in a bag! Just to help you locate it on the shelf!)
  • 1/4 Cup Cold butter or margarine (Butter makes this easier because the firmer your butter is the better, though both will work)
  • 4 oz Cream Cheese
  • 1/2 Cup sliced almonds (You can buy blanched or natural sliced almonds, natural almonds/almonds with outer skin still apparent makes a prettier topping than blanched/skinless almonds do)
Filling
 
  • 2 1/2 Packages (8 zo each) Cream Cheese (20 oz total), softened
  • 1/2 Cup Sugar
  • 2 Tbs All Purpose Flour
  • 1 Tsp Almond Extract
  • 2 Eggs
  • 1 Can (21 oz) Cherry Pie Filling (I like to use E.D. Smith)
 
Directions
  • 1. Preheat oven to 350°F. Butter the bottom and sides of a 13x9 inch pan.
  • 2. Place cookie mix in large bowl. Cut in butter and 4 oz of cream cheese, using a pastry blender or fork, until mixture is crumbly. Put aside 1 1/2 cups mixture for topping. Press remaining mixture in bottom of the pan.
  • 3. Bake for 12 minutes
  • 4. Meanwhile beat 20 oz cream cheese, the sugar, flour, almond extract and eggs with an electric mixer on medium speed until smooth.
  • 5. Spread cream cheese mixture evenly over partially baked cookie base.
  • 6. Spoon pie filling evenly over cream cheese mixture.
  • 7. Sprinkle with reserved topping and almonds.
  • 8. Bake 40 to 45 minutes or until light golden brown.
  • Cool 30 minutes. Refrigerate about 2 hours or until chilled. (This cake tastes best completely chilled! So try and be patient! But if you're like me and you have no patience...you can remove a few pieces from the hot dish and places them in the freezer for 10 minutes or so  ;)


Tuesday, June 17, 2014

Butter Cookies with Lemon Cream Cheese Frosting

I have said it before, and I will say it again, I love lemon. Lemon desserts are always the perfect thing, they satisfy your craving for sweet yet still maintain that fresh summery taste. To me, a hint of lemon can make anything better, it has a way of making a dessert or meal that much better by adding some zest and it also brings out the other flavours in your baked good or dish.

Everyone loves frosting, dont't get me wrong, I have those days where I just want to eat a bowl full but when I first made these cookies I thought frosting on each one was going to be a little too sweet. I was wrong. The cookies have that melt in your mouth crumbly, buttery texture balanced out perfectlyby the smooth and creamy lemon frosting. Each bite seems to turn to silk upon touching to your tongue. The cookie itself is your traditional butter cookie which looks and tastes like any good butter cookie should but the icing with the burst of lemon flavour brings these cookies to a new level yum.

Although cookies can seem like that easy fix they can also be a hard dessert to execute. I find when makingcookies like chocolate chip, I always believe they areunderbaked so I bake them for longer and then when I take them out the risidual heat continues to bake them and I end up with a crunchier cookie once they are cooled. My mom likes them this way but I tend to prefer soft cookies. That's what I love about these butter cookies, all you have to look for is the slight golden colour as they bake and you know they are done. Perfect consistancy guaranteed.

The other fun part about these cookies is how pretty they can be. I'm a big believer in making my food and desserts beautiful though I'm still working on the photography part of it. Cookies generally are what they are as far as looks but with the icing on these you're able to dress it up a little. I like swirling the icing as I spread the icing on my cookies in order to achieve a rose-like effect. I also just love the overall light colour of these cookies with the hint of pastel yellow in the icing from the lemon. They make me think of a little bakery you would find in a small town with those delicious and delicate treats.

I hope you enjoy these cookies as much as me and my family did!


Serves: 36

Ingredients

For the cookies

1 cup butter (softened)
1/2  cup powdered sugar
1 1/4 cups flour
3/4  cup cornstarch                  


For the Lemon Cream Cheese Frosting

2  tbs butter (soft)
3  oz cream cheese (softened)                                  
Pinch salt (This brings out the flavour but you don't want to add to much!)                                  
1 tablespoon lemon zest (I generally just zest the whole lemon)
2 1/2 cups powdered sugar                       

Instructions

For the cookies
  1. Cream butter and sugar until smooth.
  2. Stir in flour and cornstarch, mix well (refrigerating for a small amount of time can help them keep their shape while baking though I don't always do this and they turn out fine.) 
  3. Roll into 1″ balls and place on parchment lined or buttered and flowered cookie sheet.
  4. Bake at 325° for about 15-18 minutes. (Until signs of ever so slight golden colouring)
  5. Cool completely, then frost with lemon cream cheese frosting.

For the lemon cream cheese frosting
  1. Beat butter, cream cheese, and salt with electric mixer (an electric hand mixer will do if you have one) until smooth and creamy.
  2. Add lemon zest and enough powdered sugar to make a spreadable frosting. Frost the tops of the cookies.


Wednesday, January 29, 2014

Orange Bread Pudding

Let me start by saying, I by no means like orange marmalade, which is why every time my mom makes this dish I am so pleasantly surprised as to how much I absolutely LOVE it. It is the top comfort food, so perfect for the winter holidays and my favourite treat for cold winter nights. Everything about it simply screams comfort, especially that warm crème anglaise drizzled on top...or swimming in it ;)


Something I love about this recipe is the variations, you can use different breads, around the holidays we often use pantone (another thing I don't love) but is also quite nice in this recipe, you could even use, say, cinnamon bread! Though this time and most often we used just regular white toast bread, untoasted of course! I suppose you could even use other jams you like though I strongly suggest the orange marmalade, it adds bursts of tangy zest in comparison to the creamy sauce..mmmm, I want some just thinking about it!


It's a super easy dish to make as long as you have the patience to wait for it to bake, which I have none, but it's worth it!  Trust me!


Ingredients 
  • 15 slices white bread
  • Butter for the bread
  • 6 eggs
  • 2 cups 10% cream or 1 cup cream, 1 cup milk
  • 1/2 cup sugar
  • 1 1/2 tbs vanilla
  • Pinch salt
  • 1/2 jar orange marmalade
For the crème anglaise I just used a custard mix and added a little bit extra milk to make it more like a sauce than custard
 
Directions
 
  1. Butter a 9x13 glass baking dish and preheat oven to 375 degrees F
  2. In a bowl combine the eggs, cream, vanilla and salt and mix until sugar is dissolved
  3. Cut off the crusts of the bread slices and lightly butter one side of each lice of bread
  4. Cut the bread in half diagonally and lay to fill the bottom of the pan, spooning marmalade over each layer, there should be three layers (I find it best if you cut for slices diagonally for one layer but then the fifth slice just in half horizontally to fill the end space in the dish, begin each layer on the opposite side to the last so the layers overlap rather than stack)
  5. Pour the egg mixture over the bread being careful to cover all the bread
  6. Just before putting in the oven sprinkle another spoonful of sugar over the top to create a crisp crust
  7. Bake on the middle rack for about 55 minutes or until the top is golden and the center is puffed
Serve warm with the crème anglaise!


Tuesday, January 28, 2014

Corn Cakes

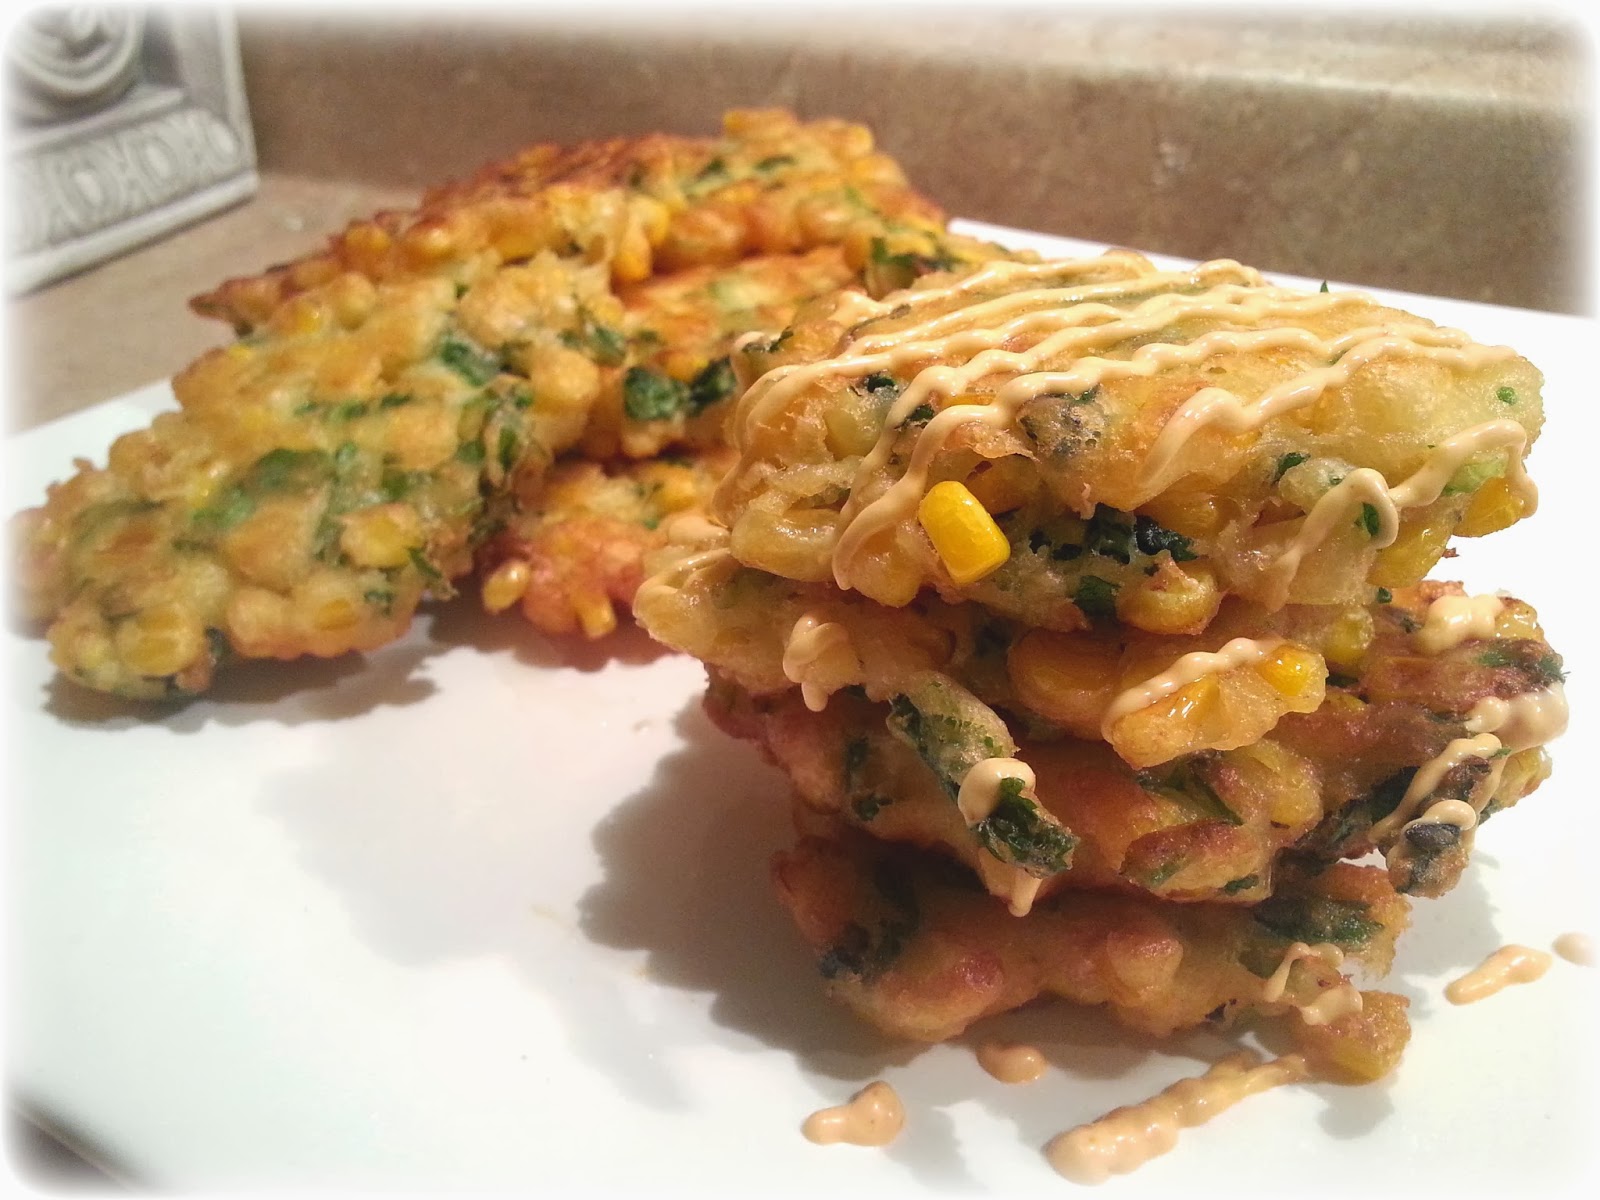
My mom recently told me that she's never had any sort of fried cake she enjoyed. Me and my friend Peyton took that as a challenge, to us, corn makes everything better. It adds a sweet pop to every bite, accompanied with a little spice is just perfect. So we made corn cakes! These corn cakes happened to be the first fried cakes she's ever liked!

Our own addition was a handful of chopped cilantro and some extra corn ;) After making it the first time I made another three batches within the next three days. My first thought was that frying things is just too much mess and too much work, I won't deny the oil left a little mess but it was a super easy recipe!

My mom suggested we add a little sauce, very simple, just mayonnaise and sriracha (an Asian hot sauce.) I know it looks like a pretty little drizzle in the photo but as soon as we were done, we added a whole lot more sauce because they just complimented each other so perfectly you simply couldn't go light! Of course if you don't like spicy you can just add a little more mayo than sriracha.


Ingredients
 
  • 1/2 cup flour
  • 1 tsp salt
  • 3/4 tsp baking powder 
  • 1/4 tsp sugar
  • 1/8 tsp cayenne pepper (could even use a little more if you like spicy!)
  • 1 large egg
  • 1/4 cup milk
  • 1 Tbs unsalted butter, melted
  • 2 cups frozen corn, thawed (I briefly microwave it)
  • 1/4 cup chopped cilantro (it originally asked for scallions though I think the cilantro gave it amazing flavour)
  • Canola or vegetable oil

Directions
  1. In a medium bowl, combine flour, salt, baking powder, sugar, and cayenne. 
  2. In a second medium bowl, whisk together the egg, milk, and butter. 
  3. Stir the wet ingredients into the dry until they are just blended. Fold in the corn and cilantro.
  4. Pour oil in large nonstick skillet (until it come up 1/4 inch on the sides) and heat over medium-high heat until the oil is shimmering. (Watch that the oil isn't too hot or they will brown quickly on the sides and not cook through the middle)
  5. For each crisp, drop a slightly rounded tablespoon of batter into the oil. Fry them in batches over medium-high heat until they are golden, about 2 to 3 minutes. 
  6. Transfer the crisps to a paper towel-lined sheet pan or plate,
  7. Repeat with the remaining batter.


Sunday, January 5, 2014

Plum Cake


This is my oma's recipe and a huge family wide favourite. There's not a branch in my family that doesn't look forward to this cake at our family get togethers in the summer. She uses the plums off the tree in their beautiful backyard and shares the rest of the plumbs with the family. We all attempt replicating her cake but it seems no one can make it as good as her, though she told me a came quite close the last time so I decided to share the recipe!

For this recipe you dont use youyr typical plumbs, you use damson plumbs. A smaller dark oval like plum that are only in season late summer/fall.


This cake is served best with a whole lot of whipped cream on top to balance out the slight tanginess of the plumbs, it is such a light and fruity cake, you could almost eat half the pan before even realizing it, then continuing because it's just that good!


Ingredients

for the Cake
  • Damson plumbs (about one basket) 
  • 150g quark (quark is the german, slightly dryer version of ricotta cheese, quark is not so easy to find though you can get it at costco but I've made the recipe with ricotta and it worked perfectly.)
  • 80g sugar
  • 7 tbs milk
  • 7 tbs oil
  • 1 tsp. vanilla
  • 300g flour
  • 1pkg baking powder (or just over 1 tbs)
For the Crumble

  • 2/3 cup sugar
  • 2/3 cup ground almonds
  • 2/3 cup flour
  • 1/2 cup butter
  • 1 tsp vanilla sugar (optional)
Directions

for the cake
  1. Preheat oven to 350 degrees F
  2. stir together wet ingredients and sugar
  3. In a seperate bowl stir together baking powder and flour
  4. mix 2 thirds of the flour mixture into wet ingredients
  5. Pour remaining third of the flour mixture onto a clean countertop and pour the dough onto the flour, knead the flour into the dough
  6. roll the dough out onto a large butter and floured cookie sheet until it reaches all the edges
  7. slice the plumbs in half, remove the pit (which doesn't always come out with ease so it's easiest just to use your fingers) then cut each half lengthwise in half again so the the plum is cut into four wedges...Tip: I leave the four slices joined by the skin to make laying them on the cake easier
  8. line up the plums on the cake in rows slightly overlapping so there's plenty of fruit on the cake, leave a little room around the edges or the plum juice will run under the dough while baking
  9. sprinkle the fruit with sugar once it's all layed on the cake
For the Crumble

  1. Mix cold butter, sugar, almonds, vanilla sugar and flour
  2. mush together with your hands until little dry lumps form, crumble over your cake
Bake the cake for 45 minutes.

Shrimp Mousse

When I first told my younger sister I was making shrimp mousse the name threw her off, but she being someone who will eat a whole tray of shrimp on her own if you put one out and don’t watch her, she wanted to know what this recipe was all about. This is a recipe I remember my mom making whenever we had company over and I LOVED it. She’d always have to hold me and my younger sister back from eating it all before she can even offer to the guests. Obviously my younger sister did not remember this and was surprised by how much she loves it all over again.

For this recipes I have a plastic mold in a dome shape, if you dont have one you can use a bowl lined with plastic wrap (you only need plastic wrap in the case that you're using a bowl, my mold is made for this so it has a lid that you remove at the end to relieve suction so that the mold will come out with ease.) My mold measures 8 inches across and is 4 inches deep.


After being refrigerated for at least 2 hours to firm up, you flip it over onto a plate and serve with any crackers you would like, I suggest a cracker that does not have too much flavour so that you don’t overpower the taste of the shrimp mold (I use stoneground crackers). Though it does turn gelatinous there also remains a nice creamy texture that easily spreads on crackers. Has to be one of my favourite snacks.


Ingredients
 
  • 1 can campbells tomato soup
  • 8oz philedelphia cream cheese
  • 1pkg knox gelatin
  • approx. 1/8 cup water (to soften gelatin)
  • 1 can cocktail shrimp, mashed
  • 3/4 cup celery, finely chopped
  • 1/4 cup onion, finely chopped
  • 1/2 cup mayonaise
Directions
 
  1. In a sauce pan stir cream cheese until melted
  2. Mix in tomato soup
  3. Soften gelatin by pouring water onto a plate and sprinkling the gelatin over top, let sit for a few minutes to soak up the water
  4. Add gelatin to cheese mixture and let stand to cool down while you prepare your vegetables
  5. Mash shrimp and add to mixture along with onion and celery, stir in mayonaise
  6. Pour into mold and let sit for at least 2 hours